Arduino tutorial#
This tutorial tells how to remotely control LEDs and servos with a Arduino Uno using botafar.
This tutorial has two sections: the first tells how control servos using Python and beginner friendly firmatazero library. The code is very similar compared to the Raspberry Pi tutorial.
The second section is for more advanced users who want send serial commands to C++ from boatafar with pySerial.
If you get confused about botafar during this tutorial, make sure to read Get started and Basics.
Arduino IDE installation#
Download Arduino IDE and install it.
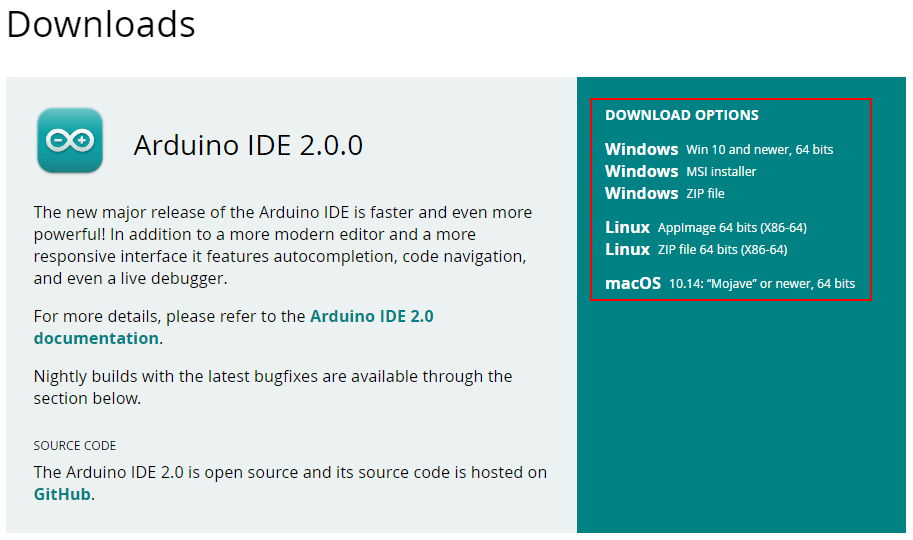
Select correct version#

Press one of the download links#
botafar installation#
Install the library (help)
pip install --upgrade botafar
On some Debian based operating systems such as Raspberry Pi OS, on you need to have libSRTP and other related network dependencies installed to be installed as well: sudo apt install libnss3 libnspr4 libsrtp2-1 -y
firmatazero#
Firmata protocol allows you to use Arduino’s pins through USB from Python running on your “host” computer.
The code comes with default Arduino IDE installation, and it can be installed by selecting: File > Examples > Firmata > StandardFirmata.
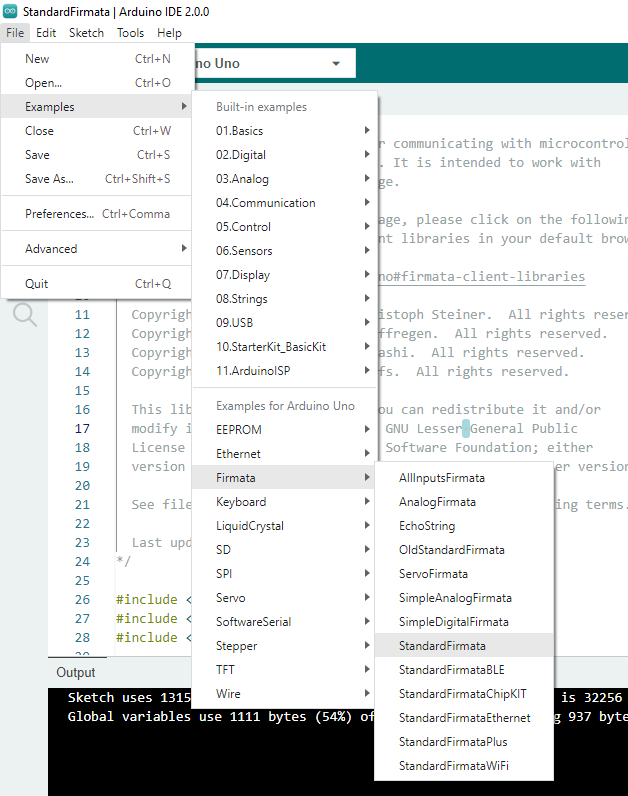
Select StandardFirmata#
Then select your board and port from Tools > Board and Tools > Port. Then press Upload.
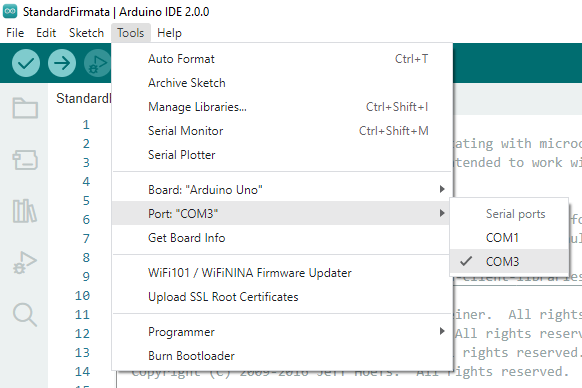
Select correct board and port#
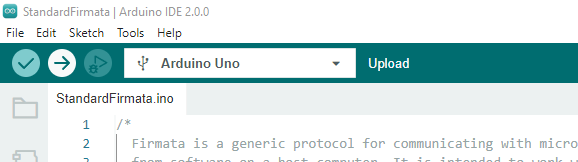
Click upload#

Confirmation after upload#
To use Firmata, you need a client library. One of the best options on Python is pyFirmata2, but it might be hard to understand. Easier option is firmatazero library, which wraps pyFirmata2 into interface familiar from GPIO Zero with Raspberry Pis, and allows accessing all pyFirmata2 features for more advanced users. To install it run:
pip install --upgrade firmatazero
Blinking an LED remotely#
Note: Arduino Unos have a builtin LED, which lights up when pin 13 is used. So you can test this code even if you do not have an LED or resistor.
Let’s now connect an LED to pin 13 with a 330 ohm resistor, note that LED’s shorter leg should be connected to ground (GND) pin:
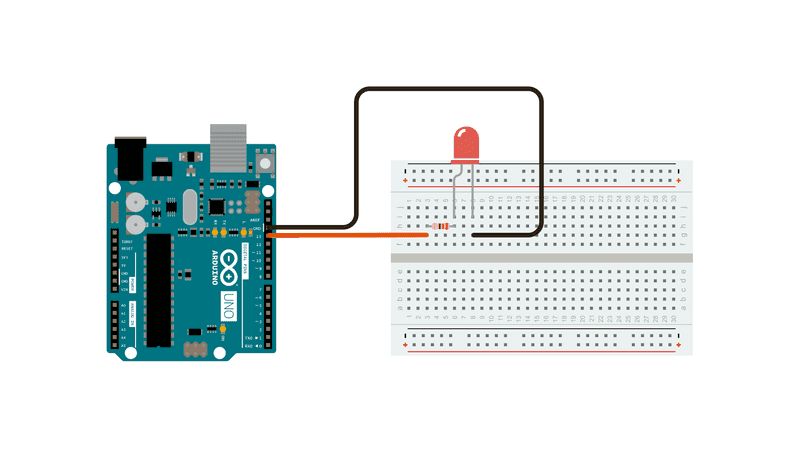
Led wiring from the Blink tutorial#
To turn the LED on for one second, let’s create and run a main.py file
from firmatazero import LED
from time import sleep

led = LED(13)

print("led on")
led.on()
sleep(1)
print("led off")
led.off()
sleep(1)
Similar to get started, the steps to make this code remote controllable are:
Import botafar
Create a control,
Buttonin this example, and bind a key from keyboard to itUse decorators (@-symbol) to select functions to call on user input
Call
botafar.run()
In this case we also create separate functions led_on and led_off and add botafar.print calls to make debugging easier.
import botafar
from firmatazero import LED

b = botafar.Button("L")
led = LED(13)

@b.on_press
def led_on():
    botafar.print("led on")
    led.on()

@b.on_release
def led_off():
    botafar.print("led off")
    led.off()

botafar.run()
Execute the main.py file, and open the returned link in browser (help).
$ python main.py

Bot running, connect at https://botafar.com/abcde-fghij-klmno
From the browser, press the Try controls -button. Now when you press and release L key from a keyboard or a touch screen, texts “led on” and “led off” get printed on terminal and the livestream, and the LED will blink.
$ python main.py

Bot running, connect at https://botafar.com/abcde-fghij-klmno
led on
led off
led on
led off
Choose a stream source from the browser. It can be a webcam, a phone or a screen share (help)
Give your bot a name and switch it to public
The browser now shows a direct link to your bot you can share with anyone in the world!
Note: if you do not need the prints and just want to blink the LED, this simpler code has the same functionality
import botafar
from firmatazero import LED

b = botafar.Button("L")
led = LED(13)
b.on_press(led.on)
b.on_release(led.off)
botafar.run()
Moving a servo remotely#
The process is very similar to Blinking an LED remotely above.

Servo wiring from the Sweep tutorial#
Wire color |
Pin |
|---|---|
Black/Brown |
GND |
Red |
5v |
Yellow/Orange |
Pin 9 |
To move the servo from left to right and middle, create and run a main.py file.
from firmatazero import Servo
from time import sleep

servo = Servo(9)

print("servo value -1")
servo.value = -1
sleep(2)
print("servo value 1")
servo.value = 1
sleep(2)
print("servo value 0")
servo.value = 0
sleep(2)
Similar to Blinking an LED remotely above, the steps to make this code remote controllable are:
Import botafar
Create a control,
Joystickin this example, and bind 4 keys from keyboard to itUse decorators (@-symbol) to select functions to call on user input
Call
botafar.run()
Let’s also create wrapper angles to for each wanted position
import botafar
from firmatazero import Servo

j = botafar.Joystick("W","A","S","D")
servo = Servo(9)

@j.on_left
def servo_left():
    botafar.print("servo value 1")
    servo.value = 1

@j.on_up_left
def servo_up_left():
    botafar.print("servo value 0.5")
    servo.value = 0.5

@j.on_up
@j.on_center
def servo_middle():
    botafar.print("servo value 0")
    servo.value = 0

@j.on_up_right
def servo_up_right():
    botafar.print("servo value -0.5")
    servo.value = -0.5

@j.on_right
def servo_right():
    botafar.print("servo value -1")
    servo.value = -1

# @j.on_down_left, @j.on_down, @j.on_down_right not used currently!

botafar.run()
Execute the main.py file, and open the returned link in browser (help).
$ python main.py

Bot running, connect at https://botafar.com/abcde-fghij-klmno
From the browser, press the Try controls -button. Now when you press and release W, A, S and D keys from a keyboard or a touch screen, and servo values get printed on terminal and the livestream, and the servo should move.
$ python main.py

Bot running, connect at https://botafar.com/abcde-fghij-klmno
servo value -1
servo value 0
servo value 1
servo value 0.5
servo value 0
Choose a stream source from the browser. It can be a webcam, a phone or a screen share (help)
Give your bot a name and switch it to public
The browser now shows a direct link to your bot you can share with anyone in the world!
Note: this simpler code has the same functionality
import botafar
from firmatazero import Servo

SERVO_VALUES = {
    "on_left":       1,
    "on_up_left":    0.5,
    "on_up":         0,
    "on_center":     0,
    "on_up_right":   -0.5,
    "on_right":      -1,
    "on_down_left":  None, # Not in use
    "on_down":       None, # Not in use
    "on_down_right": None, # Not in use
}

j = botafar.Joystick("W","A","S","D", diagonals=True)

servo = Servo(9)

@j.on_any
def move_servo(event):
    servo_value = SERVO_VALUES[event.name]
    if servo_value is not None:
        botafar.print(f"servo value {servo_value}")
        servo.value = servo_value

botafar.run()
Accessing pyFirmata2#
pyFirmata2 documentation has many features not available in firmatazero, but you can use them with get_board() function:
from firmatazero import get_board

board = get_board()
# Do something with board:
board.analog[0].register_callback(my_callback)
You can also set the port instead of automatic detection, good when working with multiple Arduinos:
from firmatazero import set_port

set_port("COM1")
# Do something with firmatazero LED, Servo
You can also set different board than Arduino Uno:
from pyFirmata2 import ArduinoMega
from firmatazero import set_board

set_board(ArduinoMega("COM4"))
# Do something with firmatazero LED, Servo
pySerial#
Next let’s see how to use custom C++ code on Arduino with botafar remote controls. This makes sense if you want to use all available Arduino features, or you are more familiar with C++ than Python. pySerial allows sending and receiving messages between Arduinos C++ and host computers Python through serial communication.
Note that for beginners the eralier firmatazero based approach is most likely easier to follow.
Setup#
First use Arduino IDE to upload following code to your Arduino Uno. Remember to choose correct board and port through Tools meanu first.
#include <Servo.h>

String command;
String value;
Servo servo;

void setup() {
  // Prepare servo in pin 9
  servo.attach(9);
  // prepare led in pin 13 (== LED_BUILTIN)
  pinMode(LED_BUILTIN, OUTPUT);
  // Setup serial THIS MUST MATCH ON PYTHON SIDE
  Serial.begin(9600);
}

void loop() {
  // If data available
  if(Serial.available()) {
    // Read command and value, separated by space
    command = Serial.readStringUntil(' ');
    value = Serial.readStringUntil('\n');

    // Set LED value if command == "led"
    if (command == "led") {
      if (value == "on") {
        digitalWrite(LED_BUILTIN, HIGH);
        Serial.println("led on");
      } else if (value == "off") {
        digitalWrite(LED_BUILTIN, LOW);
        Serial.println("led off");
      } else {
        Serial.println("led: unknown value");
      }
    // Set servo position if command == "servo"
    } else if (command == "servo") {
      servo.write(value.toInt());
      Serial.println("servo in position: " + value);
    } else {
        Serial.println("Unknown command");
    }
  }
}
(This code implemented to be easily modified and extended. It uses dynamic memory allocation and does not take advanced Arduino topics such as heap fragmentation and memory exhaustion into account.)
Then install pySerial by running:
pip install pyserial
Lastly connect LED, resistor and servo to Arduino Uno’s pins 9, 13, 5V and two grounds (GND), similarly to Blinking an LED remotely and Moving Servo remotely.
Testing serial connection#
To test the serial connection, on Arduino IDE open the Seral Monitor from Tools > Serial Monitor.

Open Serial Monitor#
You can now set LED state and servo angle through the monitor with commands such as led on, led off, servo 0, servo 180 and servo 90. To send you need to press Ctrl + Enter.
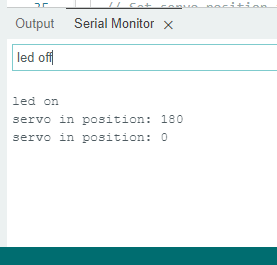
Serial Monitor sending and replies#
To test serial connection with pySerial, first close the Serial Monitor, otherwise you get ‘Access is denied.’ response. Then read your port from Arduino IDE’s tool menu, such as “COM4”.
Next create and run test.py file, remember to adjust the port (“COM4” in this example) to match to your own:
import serial

PORT = "COM4" # Change this to match your port!

ser = serial.Serial('COM4', 9600)
print(
    "\nGive commands to Arduino, such as 'led on' or 'servo 180'.\n"
    "Press enter to exit.\n"
)

while True:
    command = str(input ("Command: "))
    if command == "":
        break

    ser.write(f"{command}\n".encode('ascii'))
    response = ser.readline().decode("ascii").strip()
    print(response)
Now you can give the same commands from Python.
$ python test.py

Give commands to Arduino, such as 'led on' or 'servo 180'.
Press enter to exit.

Command: servo 180
servo in position: 180
Command: led on
led on
Accessing LEDs and servos remotely through serial connection#
Next let’s create and main.py, remember to set the correct port again:
import botafar
import serial
from threading import Lock

PORT = "COM4" # Change this to match your port!

ser = serial.Serial('COM4', 9600)
lock = Lock() # Handle potential concurrency issues
b = botafar.Button("L")
j = botafar.Joystick("W","A","S","D")

@b.on_press
def led_on():
    with lock:
        botafar.print("led on")
        ser.write("led on\n".encode('ascii'))

@b.on_release
def led_off():
    with lock:
        botafar.print("led off")
        ser.write("led off\n".encode('ascii'))

@j.on_left
def servo_left():
    with lock:
        botafar.print("servo angle 180")
        ser.write("servo 180\n".encode('ascii'))

@j.on_up_left
def servo_up_left():
    with lock:
        botafar.print("servo angle 135")
        ser.write("servo 135\n".encode('ascii'))

@j.on_up
@j.on_center
def servo_middle():
    with lock:
        botafar.print("servo angle 90")
        ser.write("servo 90\n".encode('ascii'))

@j.on_up_right
def servo_up_right():
    with lock:
        botafar.print("servo angle 45")
        ser.write("servo 45\n".encode('ascii'))

@j.on_right
def servo_right():
    with lock:
        botafar.print("servo angle 0")
        ser.write("servo 0\n".encode('ascii'))

botafar.run()
Execute the main.py file, and open the returned link in browser (help).
$ python main.py

Bot running, connect at https://botafar.com/abcde-fghij-klmno
From the browser, press the Try controls -button. Now when you press and release L, W, A, S and D keys from a keyboard or a touch screen, and LED/servo messages get printed on terminal and the livestream, and the servo should move and LEDs blink.
$ python main.py

Bot running, connect at https://botafar.com/abcde-fghij-klmno
servo angle 135
servo angle 180
servo angle 90
led on
led off
Choose a stream source from the browser. It can be a webcam, a phone or a screen share (help)
Give your bot a name and switch it to public
The browser now shows a direct link to your bot you can share with anyone in the world!